


Table of contents
- The end game of OpenID Connect Flows- The Identity Token
- Structure of the ID token
- ID Tokens Vs. Access Tokens
- Key Actors in OpenID Connect Flows
- OpenID Connect Flow Types
- The Implicit Flow
- Steps Involved in the Implicit Code Flow
- The Authorization Code Flow
- Steps Involved in the Authorization Code Flow
- The Hybrid Flow
- Steps Involved in the Hybrid Flow
- Wrapping Up
The first part of this two-part series was an introduction to user authentication with OpenID Connect(OIDC). I discussed OpenID Connect as a protocol and how identity providers use it to offer user authentication APIs that provide seamless sign-up and login experiences for developers and users. I also briefly mentioned OIDC authentication flows and ID Tokens as the medium through which OIDC achieves user authentication.
In this 2nd part, I delve more deeply into the inner workings of the OpenID Connect authentication flows. I discuss ID Tokens and their use in OIDC authentication process.I also explain the various OIDC flow types and how they are used to obtain ID tokens.
The end game of OpenID Connect Flows- The Identity Token
An identity token(ID token) is a security token specified by OIDC. It is a piece of data describing how and when users authenticate themselves at an authorization server/identity provider. It's the digital object that transmits a user's data with the IdP to the client app and is essentially what the client uses to authenticate a user and customize their experience while using the app.
Let's consider it from this perspective as well. An ID token can be compared to an identity card issued and digitally signed by an identity provider and delivered to a client. So similar to a physical identity card, it proves a user is who they claim to be and has identity data of the user, e.g., their name.
OpenID-compliant identity providers, e.g., Google, Facebook, etc., use ID tokens to provide enough data for client applications, e.g., app backends, to decide if they want to proceed with completing a user sign-up/login.
Structure of the ID token
Now let's take a look at the structure of an ID token. ID tokens, at their core, are essentially JSON Web Tokens(JWT). A JWT is an open standard for securely transmitting information between parties as a JSON object. Where the parties, in this case, are the IdP and a client app. ID tokens are also base64url encoded, so when you initially receive them, they do not look like a JSON object. You must decode them using these libraries or your code to get the original JSON Object.
In short, an ID token’s structure is just a JSON object that is base64url encoded before transmission. It is encoded because it carries sensitive data that should not be transmitted as plain text for security reasons.
The snippet below is an example of what a JWT looks like.
eyJhbGciOiJIUzI1NiIsInR5cCI6IkpXVCJ9.eyJpc3MiOiJodHRwOi8vbXktZG9tYWluLmF1dGgwLmNvbSIsInN1YiI6ImF1dGgwfDEyMzQ1NiIsImF1ZCI6IjEyMzRhYmNkZWYiLCJleHAiOjEzMTEyODE5NzAsImlhdCI6MTMxMTI4MDk3MCwibmFtZSI6IkphbmUgRG9lIiwiZ2l2ZW5fbmFtZSI6IkphbmUiLCJmYW1pbHlfbmFtZSI6IkRvZSJ9.bql-jxlG9B_bielkqOnjTY9Di9FillFb6IMQINXoYsw
And this is what it looks like once it is decoded.
{
   "iss":"http://my-domain.auth0.com",
   "sub":"auth0|123456",
   "aud":"1234abcdef",
   "exp":1311281970,
   "iat":1311280970,
   "name":"Jane Doe",
   "given_name":"Jane",
   "family_name":"Doe"
}
As you can see in the image above, the JWT contains the user's identity data like their name and some other fields. Collectively these fields are called claims. Claims are a section of the JSON payload of the JWT and prove that a user/subject is who they claim to be. They offer data on the authentication outcome and user profile information to customize the user's experience. An ID token is usually valid for 36000 seconds (10 hours), but developers can adjust this value. For a typical app/website sign-up sequence, you can set the expiry to 3600(1 hr).
ID Tokens Vs. Access Tokens
ID tokens are not to be confused with access tokens. Access tokens are the equivalent of ID tokens in Oauth2.0. They are to OAuth2.0 (authorization), what ID tokens are to OIDC(authentication). Access tokens are returned together with ID tokens after a user is authenticated using the OIDC authentication flows, but they do not have any identity/user profile information. They, however, contain the security credentials/authorization information the client application can use to request access to the user's protected resources like their phone contacts, etc., or an API. Access tokens are also JWTs that have fields like a scope that determines the actions allowed by the client accessing a resource.
That's about it for ID tokens and access tokens. Now let's define a few essential actors who will appear regularly in the rest of this article.
Key Actors in OpenID Connect Flows
Client: A client in the OIDC flow is the entity or service requesting to authenticate a user’s identity and is typically called the Relying Party (RP) in OAuth circles. It can be, for example, a web application, a JavaScript browser application, or a mobile app.
User: A user in a typical OIDC flow is the person or customer signing up/signing into a client's mobile/web app whose details need to be authenticated with a selected identity provider, e.g., Google. The IdPs authorization server returns the results of this authentication to the client app as an ID token. Information from the token, like their name, is used to customize the user's experience on the app.
Authorization Server: An authorization server is a framework/engine/component belonging to the identity provider. Its primary job is to authorize a client by validating their credentials. It is also used to generate tokens and access policies for use in OAuth and OpenID Connect flows. Clients interact with the authentication server by sending it an authentication request(POST/GET) with fields like scope, redirect URIs, and their client id and client secret credentials.
Authorization Endpoint: The authorization endpoint is a URL used to access an authorization server. Clients use it during OIDC flow sessions to communicate with an authorization server.
Authorization Code- The authorization code is a value the authorization server sends back to a client after it has successfully validated them. A client uses this code value in the authorization code flow process to obtain an ID token.
Redirect URI-A redirect URI or reply URL is the client endpoint an authorization server sends the authorization code or ID token to(depending on the flow) after successfully validating a client. It's also the URL users are redirected to once the client app has been successfully authorized and granted an authorization code or access token. Because it receives crucial information, clients are advised to register the correct value of this URI during their setup with an identity provider so that sensitive information is not mistakenly sent to the wrong location.
Client Id-The client Id is a public identifier for a client/client app. It's usually a 32-character hex string to make it harder to guess for security purposes. It is the username setup for the client/company on the authorization server of an IdP.
Client secret: This is a secret value known only to the client application and the authorization server. It's the password value to be used together with the Client Id when interacting with the authorization server during an OIDC flow process. This value cannot be generic and guessable for obvious security reasons, so it must be generated using a strong algorithm. Client applications are advised to store the encrypted version of the password on their servers to mitigate any security breaches.
Scope: Scopes in OIDC are a concept borrowed from OAuth2.0 and are used to specify the extent of access privileges that can be granted when issuing an access token. In OIDC authorization requests, scopes are values used to specify the amount of a user's information that IdPs should return in an ID token.
Refresh token: A refresh token is used to obtain additional access tokens after the original one expires. They enable developers to get access tokens they need long after user authentication. NB: Developers cannot prompt users to reauthenticate themselves just to get more access tokens and that's why refresh tokens exist.
OpenID Connect Flow Types
OpenID Connect Flows describes how a client communicates with an OIDC identity provider to authenticate a user to acquire an ID token. They dictate how the Identity Provider handles authentication. These flow types were defined initially in OAuth2.0 as Grant types(Grant types are the means OAuth2.0 uses for obtaining access tokens). OpenID Connect leverages these OAuth 2.0 grant types to define its authentication flow types; however, they are essentially the same process with different names and results.
The remainder of this article will discuss the three main flow types: authorization code flow, implicit code low, and hybrid flow code.
The Implicit Flow
The implicit flow is the simplest but least secure authentication flow among the OIDC flows. In this flow, a client must send an authentication request to the **authorization endpoint **of the IdPs authorization server to obtain tokens(ID tokens and access tokens). These tokens are sent directly to the client's redirect endpoint. The authorization server does not explicitly validate the client's credentials as the other flow types do. However, it still performs some sort of client verification using the clients/company's redirect URI, which is also sent in the request. It checks to see if the redirect URI preconfigured with the IdP is the same as the one sent in the authentication request. In addition, it validates the authentication request to confirm all necessary field values, e.g., scope, have been added.
Sample Authorization request for Implicit flow
curl -I --request GET 'cloud-ecma.herokuapp.com/api/v2/idp/authorize? response_type= id_token&scope=o penid%20list_tenants&client_id=a.unique.client.id.string&redirect_uri=https%3A%2F%2 Fecma-app.com%2Fapp%2Fcallback'
If the implicit flow is not secure, why was it invented? The implicit flow originated in the early days of web and mobile app development. It was created for client-side web applications (such as JavaScript clients) and mobile apps that wished to authenticate users but lacked the necessary infrastructure and security requirements. Sensitive information like** client secrets** were not permitted to be stored by apps then. They could only store and use **client id **values, which were insufficient for the authorization performed by more secure flows like the authorization code flow.
Another reason this flow was advantageous in the past was that these client-side web applications were scripts that were hosted by web browsers rather than real web servers, so these browsers could not host the APIs and logic required for all the steps in the more advanced flows. For example, they could not implement the token retrieval step in the authorization code flow because it required a client secret and a backend API to make the token request call.
Even though the implicit flow was sufficient for solving specific problems in the past, it still came with security risks, the biggest of them being the transmission of plain token information to the redirect URLs of these browser-based apps. Because these apps are/were browser-based, their redirect URLs are exposed to interception by malicious actors online who could get the tokens and have illegal access to client data.
In light of that, the OAuth community has deprecated the implicit flow. Mobile and web apps have evolved and now have the infrastructure to host their own backends and implement the more advanced flow types. Also, innovations like the authorization code flow with PKCE have enabled mobile apps to have client secrets, a requirement of using the authorization code flow.
These secrets cannot be stored per OAuth rules but are dynamic and can be generated on the fly for every session. Mobile app developers are encouraged to use this new flow instead since its simplicity matches the implicit flow but is more secure. In the next section, I discuss the regular authorization code flow( both web and mobile clients can use this), which is very similar to its PKCE counterpart.
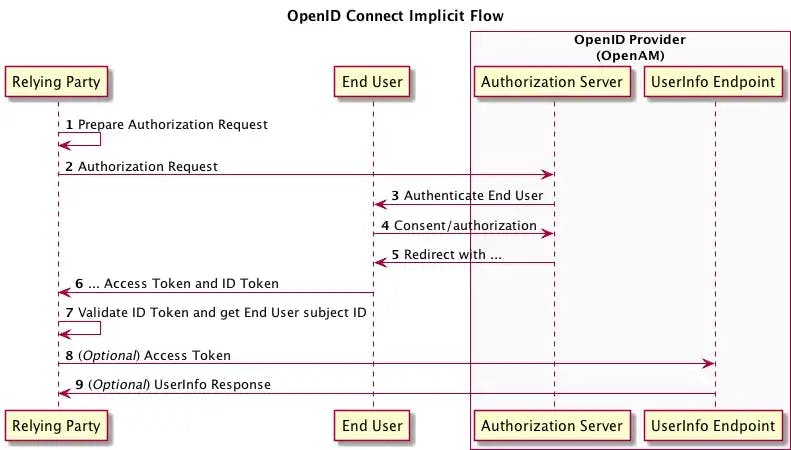
Steps Involved in the Implicit Code Flow
The user selects the signup/login option from the list of available IdPs(login with Facebook, Google, etc.) on the app/web home page.
Depending on the login option selected, the app backend sends an authorization request to the authorization endpoint of the IdPs auth server.
Once the request hits the auth server, the user is redirected to the authorization web page/authenticator app of the IdP to enter their credentials and consent for the app to access their profile information.
After the user enters their creds and grants consent, the IdP sends the ID token and access token to the redirect URI specified in the authorization request sent in step 2. The app validates and decodes the ID token to get the user's profile details.
The Authorization Code Flow
The authorization code flow is currently one of the most advanced and secure flow among the OIDC flow types. It is also the most flexible and allows mobile and web clients to obtain tokens securely. It's a two-step process in which a client acquires an authorization code from an IdP's authorization server using a client id and a client secret.
This code is subsequently exchanged for an ID token and access token at the IdP's token endpoint via a token request API call. Finally, the client app backend decodes the ID token and applies it to the user's session to customize their experience on the app. It is more secure compared to the implicit flow because, with this flow, the authorization server does not return the token information directly to the client's redirect endpoint but instead returns an authorization code. Hackers can still intercept this code, but it will be useless because it does not contain any token information they are after.
Sample Authorization request for Authorization Code flow
curl -I --request GET 'cloud.herokuapp.com/api/idp/authorize? response_type=code &scope=openid%20list_tenants&client_id=a.unique.client.id.string&client_secret=a.unique.client.secret.string&redirect_uri=https%3A%2F%2 Fecma-app.com%2Fapp%2Fcallback'
Sample Token Request for Authorization Code flow
curl --request POST 'cloud-ecma.herokuapp.com/api/v2/idp/token'
--header 'Content-Type: application/x-www-form-urlencoded'
--header 'Authorization: Basic YS51bmlxdWUuY2xpZW50LmlkLnN0cmluZzphLnVuaXF1ZS5jbGllbnQuc2VjcmV0LnN0cmluZw =='
--data-urlencode 'grant_type=authorization_code' \ --data-urlencode 'code=b2f6f849d20c4a5c'
--data-urlencode 'redirect_uri=ecma-app.com/app/callback'
The authorization code flow is most suitable for serverside web applications whose source code is not public and can securely store a client secret. It's also ideal for applications whose backends can easily implement the API flows needed to interact with the token endpoint.
There is a variation of the authorization code flow specifically for mobile apps that cannot store client secrets called the authorization code flow with PKCE. This PKCE flow is very similar to the regular authorization code flow, so I won't discuss it separately in this article. You can read more about it here. But the main difference between them is that the regular auth code flow allows a client to store a client secret, but with the PKCE version, clients need to dynamically generate a secret on the fly for every user authorization session.
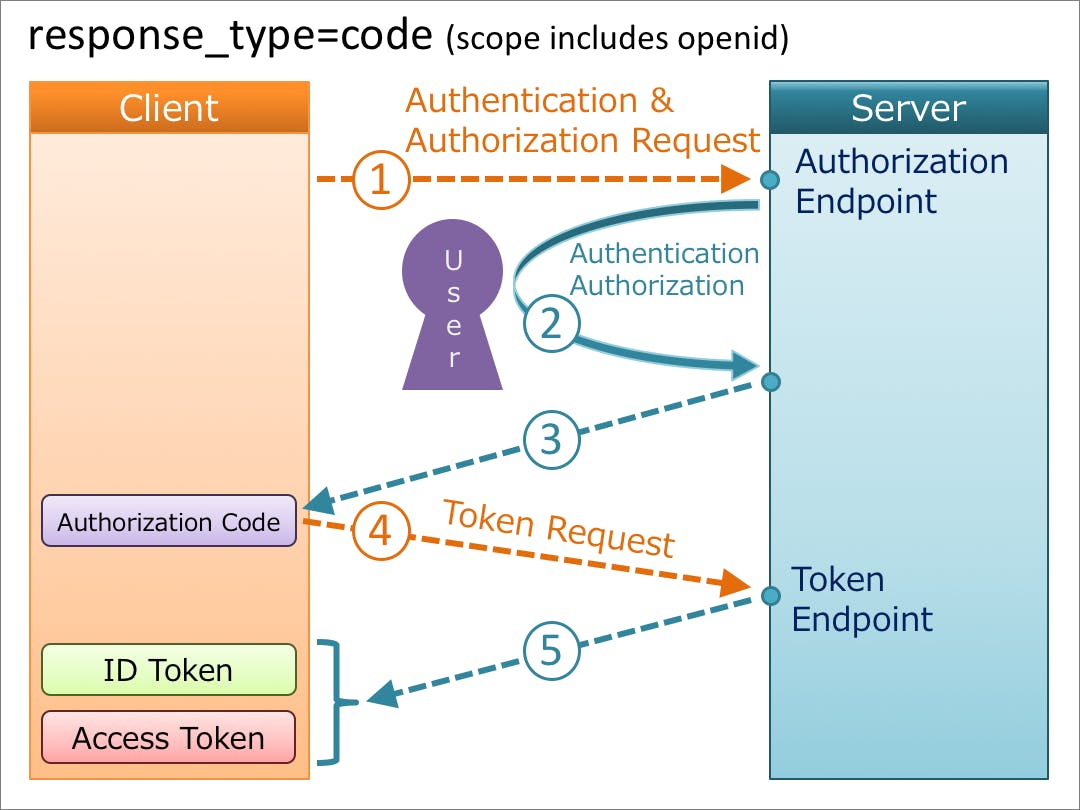
Steps Involved in the Authorization Code Flow
The first step in the authorization code flow involves a client sending an authorization request to the IdPs authorization server. This request aims to validate the client's credentials with the IdP and get an authorization code in exchange. This initial API call is triggered from the client app's front end by the user, depending on the sign-up/login options they select. If a user selects Google for sign-up, then the API call at the backend goes to Google's auth server. If they choose Facebook/Twitter, the API call goes to those auth servers.
Once the authorization request has reached the selected authorization server, the user is directed to an authentication web page/authenticator app to enter their login and password information.
The authorization server posts an authorization code to the client redirect url supplied in the authorization request once the IdP has authorized the user.This ends the first half of the process.
The second half of this process involves the client sending a token request to the IdPs token server endpoint. This request, usually a POST/GET, has a body that includes the authorization code value returned from the first half of the process, the client secret, and the client id values(These client credentials are passed as a basic auth authorization header in the request).
--header 'Authorization: Basic YS51bmlxdWUuY2xpZW50LmlkLnN0cmluZzphLnVuaXF1ZS5jbGllbnQuc2VjcmV0LnN0cmluZw =='
Upon reception of the request, the token server validates it to confirm that the client credentials(secret and client id) belong to the same caller that initiated the request in the first steps. Once validation is completed, the response containing the id token and access token values is returned to the client immediately because it's a synchronous call. And that's about it for the authorization code flow.
The Hybrid Flow
The hybrid flow, unlike the other two, exists only in OpenID Connect. It is not a derivative of the OAuth grant types but is a flow introduced by the builders of the OpenID Connect protocol that gives developers the best of both worlds. As the name suggests, it's a hybrid/combination of the abilities of the authorization code flow and the implicit flow but can only be used by clients that can securely store their client secrets.
With this flow, a client can receive the ID token and authorization code on their redirect endpoint with just one call to the authorization server. For app use cases that require just the ID token for user authentication, there is no need for the client to make another call to the token endpoint since the ID token is returned upon the first call. This feature makes it very convenient for developers who wish to implement it.
But for use cases that require the access token to gain access to a user's resources or some other API, a second trip has to be made to the token endpoint. Access tokens are not returned/exposed with ID tokens in the first round trip for security reasons. They are sensitive data that can give anyone illegal access to a client's resources. The hybrid flow is ideal for applications that require instant access to an ID token but still want to maintain a certain level of security.
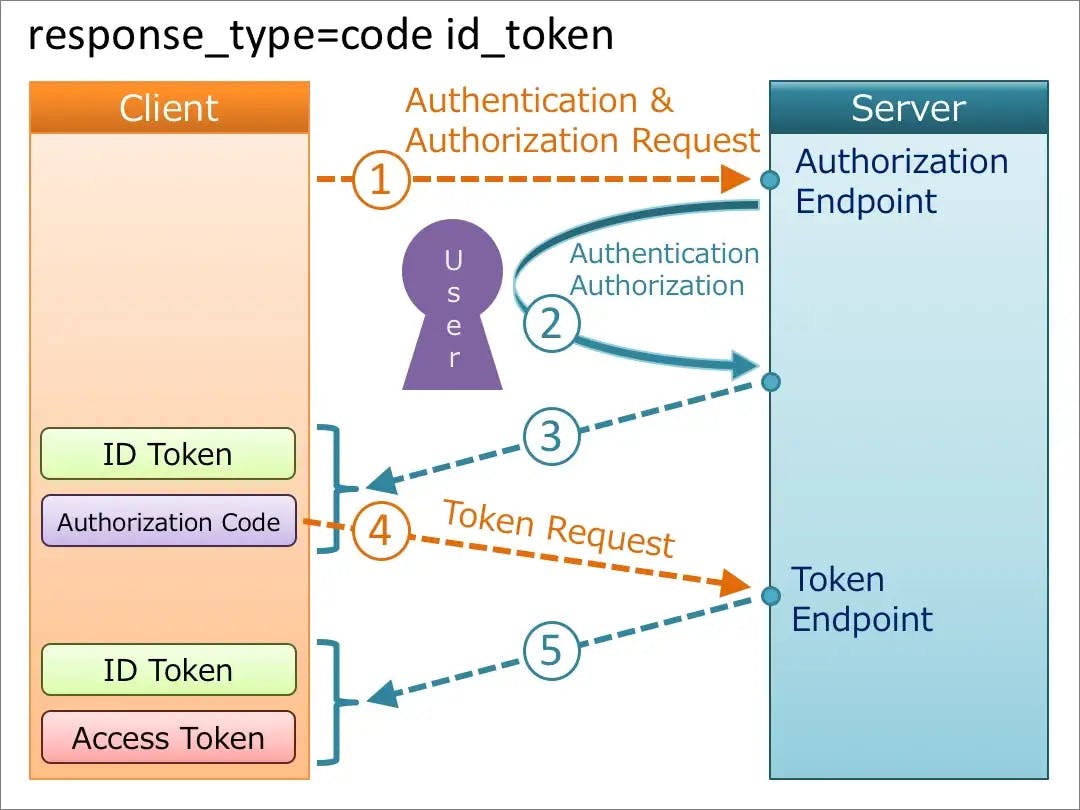
Steps Involved in the Hybrid Flow
The user selects the signup/login option from the list of available IdPs(login with Facebook, Google, etc.) on the app/web home page.
Depending on the login option selected, the app backend sends an authorization request to the authorization endpoint of the IdPs auth server.
Once the request hits the auth server, the user is redirected to the authorization web page/authenticator app of the IdP to enter their credentials and consent for the app to access their profile information.
After the user enters their creds and grants consent, the IdP sends the ID token and an authentication code to the redirect URI specified in the authorization request sent in step 2. The app validates and decodes the ID token to get the user's profile details.
The client can, later on, make a token request call to exchange the authorization code and client credentials(id and secret) for the access token and refresh token(optional) if needed.
Wrapping Up
In this two-part series, we have learned about the OpenID Connect Protocol and how its flows can be used for user sign-up and logins. I hope this article has given you a solid foundation for your journey with Open ID Connect. Let me know what you think in the comment and feel free to reach out to me if you have questions. I'm happy to help or point you in the right direction. Cheers.